New World Healer Build 2023 - The Ultimate Guide for PvE
 by BagginsTV — Published on
 In this guide, you will find the best healer builds and all the key information for healing in PvE, from explanations of weapon choices to skill trees for each load out, plus guidance on everything from necessary gems to playstyle tips to ideal armor and, if applicable, where to farm each piece.
Check out the PvP Healer Guide.
Intro
This guide is brought to you by BagginsTV, in collaboration with NWDB.
All information is based on the latest version of New World, and is accurate for the Brimstone Sands update.
If video guides are more up your street, then all the information can also be found in my YouTube video right below.
Baggins' video guide is up to date with Season 3. The written guide rework is a work in progress.
If you're more of a reader, however, or are looking for all the handy links and item info pages all in one place, then read on!
Weapon Choices
Life Staff + Void Gauntlet
This is the most effective PVE healing build, as they are currently the only two weapons that scale with focus, and the only two weapons which provide ways to restore the health of allies.
Note: You may consider using Rapier or Ice Gauntlet with your Life Staff in some fights if your tank is struggling to keep the enemies attention off you, but for this guide we will be strictly focusing on the Life Staff and Void Gauntlet build for its raw healing and support potential.
Attributes
- 310 FOC + 200 CON [Recommended] — This is the classic build, and while it is safe, it is very effective.
- 410 FOC + 100 CON — This is a speedrun build, and very risky due to your one shot potential.
- 250 FOC + 150 INT + 115 CON — This is a good DPS build. It is ideal if you want to provide extra damage for your team, and is usually used to flex or by a secondary healer.
Weapon Skills
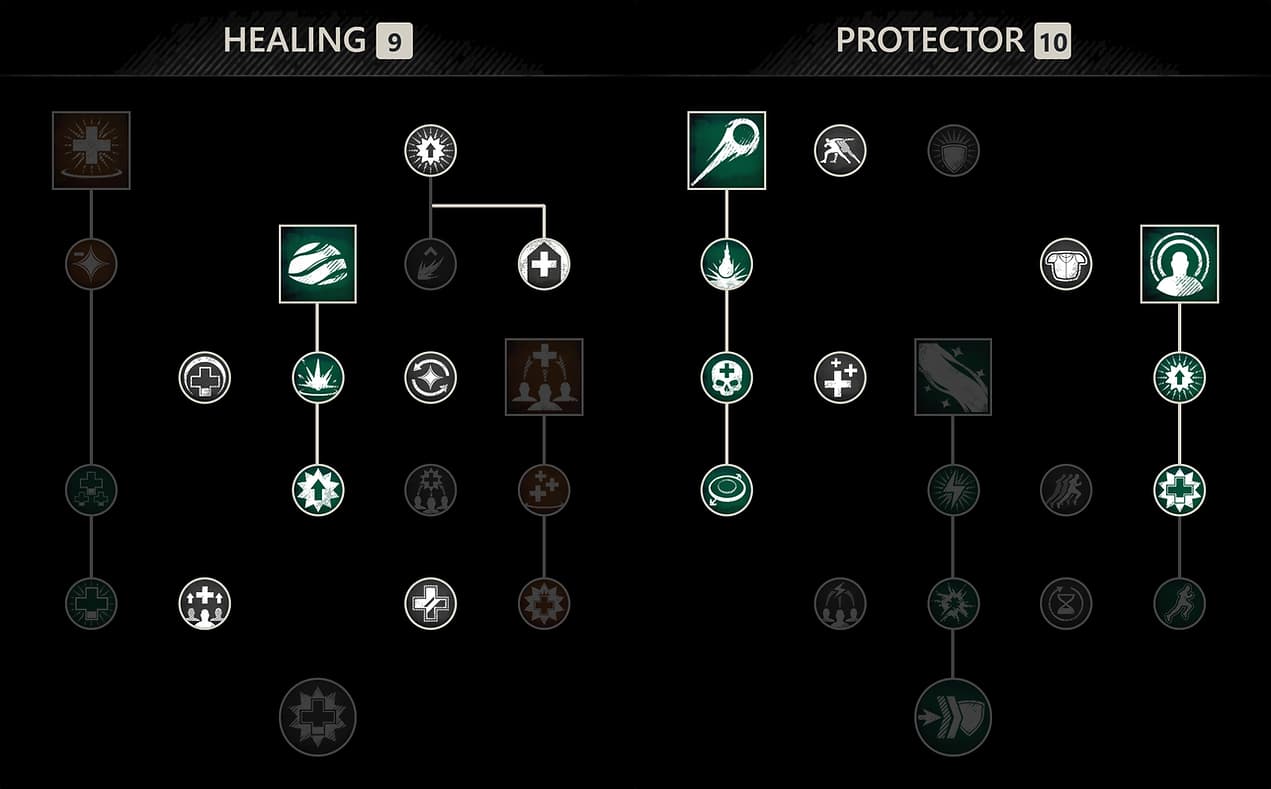
Life Staff
Standard Build
This is the go-to build for healing, and is commonly regarded as a good allrounder.
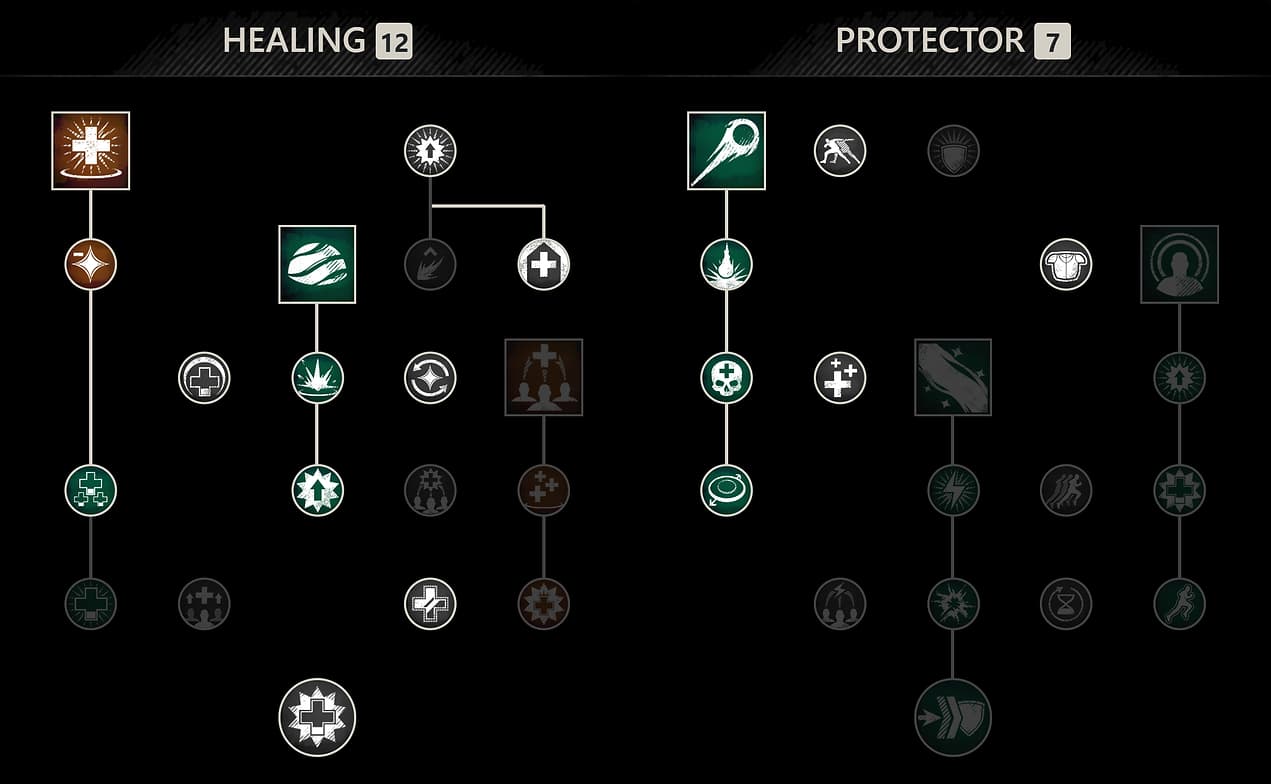
Aoe Build
This build should be used when healing an all-melee group.
Void Gauntlet
Standard Build
This is the best build when pairing Void Gauntlet with Lifestaff in a true support fashion, it focuses on healing and provides buffs to your allies whilst de-buffing enemies.
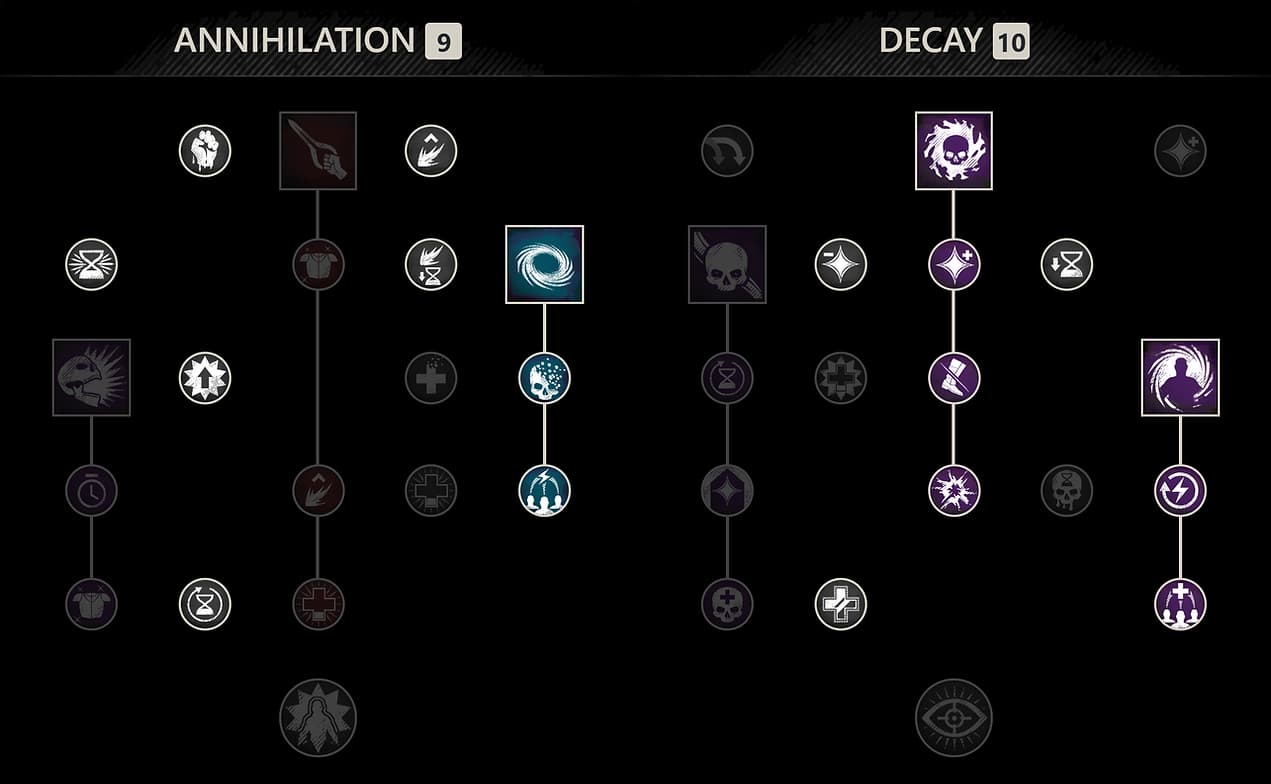
Dps Build
The go-to build for secondary healers, as it leans towards higher damage output, although with less team healing and support.

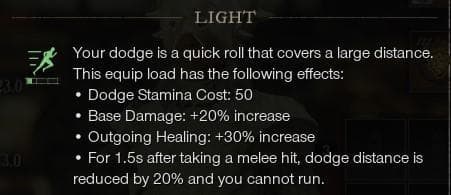
Equip Load
Light Equip Load is the classic. Due to the large boost in outgoing healing it provides and the huge benefit of the Quick Roll, you should be sticking to a Light Equip Load for all healing.
The best way to achieve this whilst maximizing your armor rating is to equip a Light Helm, Light Gloves, Light Legs and Light Boots, and a Medium Chest.
Perks to Aim For
Weapon Perks
Life Staff
For all builds and secondary weapons, you should be looking for a Life Staff with ![]() Blessed +
Blessed + ![]() Refreshing Move +
Refreshing Move + ![]() Refreshing Divine Embrace,
Refreshing Divine Embrace, ![]() Mending Protection, or
Mending Protection, or ![]() Keen Beacon.
Keen Beacon.
Void Gauntlet
For healing builds, you want to go for ![]() Blessed +
Blessed + ![]() Refreshing +
Refreshing + ![]() Refreshing Rupture.
Refreshing Rupture.
However, for damage-orientated builds, you want a Void Gauntlet with ![]() Enchanted +
Enchanted + ![]() Refreshing Move + Bane Perks.
Refreshing Move + Bane Perks.
Gear Perks
Armor
Your armor pieces should have a Ward Perk, plus any combination of ![]() Refreshing, relevant Life Staff Ability Perks or Void Gauntlet Ability Perks,
Refreshing, relevant Life Staff Ability Perks or Void Gauntlet Ability Perks, ![]() Physical Aversion,
Physical Aversion, ![]() Elemental Aversion, and
Elemental Aversion, and ![]() Shirking Fortification. You should also make sure to have one count of the
Shirking Fortification. You should also make sure to have one count of the ![]() Shirking Energy perk, and this should specifically be on your Legs piece.
Shirking Energy perk, and this should specifically be on your Legs piece.
Amulet
Your Amulet should have the ![]() Health perk, plus any combination of
Health perk, plus any combination of ![]() Divine,
Divine, ![]() Fortified,
Fortified, ![]() Stamina Recovery, Protection Perks, and
Stamina Recovery, Protection Perks, and ![]() Shirking DoT Cleanse.
Shirking DoT Cleanse.
Ring
For your Ring, BiS is ![]() Hearty,
Hearty, ![]() Sacred, and
Sacred, and ![]() Refreshing.
Refreshing.
However, if you are struggling to find the above ring, as it can be expensive to both craft and buy, then a good starter ring would be ![]() Hearty and
Hearty and ![]() Sacred, and then your choice of
Sacred, and then your choice of ![]() Void Damage,
Void Damage, ![]() Nature Damage,
Nature Damage, ![]() Leeching, or
Leeching, or ![]() Keen Awareness.
Keen Awareness.
Earring
BiS for your Earring is ![]() Refreshing Toast,
Refreshing Toast, ![]() Healthy Toast, and
Healthy Toast, and ![]() Refreshing.
Refreshing.
Again, if you are struggling to find the above earring, then a good starter piece would be ![]() Refreshing Toast and
Refreshing Toast and ![]() Healthy Toast, and then your choice of
Healthy Toast, and then your choice of ![]() Regenerating,
Regenerating, ![]() Nimble,
Nimble, ![]() Evasive, or
Evasive, or ![]() Beloved.
Beloved.
Ability Perks
As mentioned in the section above, it will help you as a healer to acquire certain Ability Perks on your Armor and Weapons.
Due to the way weapon swap mechanics work (any perks on a weapon are only active whilst you have the weapon drawn) it may be best to aim to have your main healing ability perk on your Life Staff and pick up the other ability perks on your armor.
Which should be used as your weapon perk can be down to personal preference, but to help your decision making, it is generally recommended to have ![]() Refreshing Divine Embrace or
Refreshing Divine Embrace or ![]() Mending Protection on your Life Staff. For Void Gauntlet,
Mending Protection on your Life Staff. For Void Gauntlet, ![]() Refreshing Rupture is ideal for pure healing builds, or
Refreshing Rupture is ideal for pure healing builds, or ![]() Voracious Blade for damage-enhanced builds.
Voracious Blade for damage-enhanced builds.
Every other Life Staff and Void Gauntlet perk is best to have on your armor. Some recommended armor ability perks to include on your armor as a healer are ![]() Keen Beacon,
Keen Beacon, ![]() Fortifying Sacred Ground,
Fortifying Sacred Ground, ![]() Diminishing Orb, and
Diminishing Orb, and ![]() Nullifying Oblivion.
Nullifying Oblivion.
Best Drops to Farm
Weapons
Life Staves
 Glowing Lifecrystal Staff is BiS for the Standard Healing build.
 Staff of the Throne is a great Lifestaff to use when healing all-melee groups.
 Spiritpool is a wildcard as
  Splash of Light isn’t used often, but this is a great Life Staff to use if you are using that ability.
 Oread's Anger and
  Will of the Ancients do not have any ability perks on them, but are very easy to acquire and will carry you far until you get a better Life Staff.
Void Gauntlets
 Dark Vengeance is the only Void Gauntlet that drops with
  Blessed + other good perks for Healers.
 Corrupt Sacrifice could be used in
  The Ennead and The Lazarus Instrumentality if you’re more damage focused, such as when using
  Void Blade, but generally you will have to buy or craft a Void Gauntlet if you want to get ideal perks and stats for this build.
Armor
Note: The chest pieces are Light and should not be used, as your gear should include a Medium Chest Piece.
 Sagacious Set is a good starting set for healers as it provides some nice perks, but you will look to replace this as and when you can with pieces that have Ward on them.
- Spectral Tempestuous Set set is an amazing set to run in Corrupted Expeditions, both normal and mutated. I highly recommend running the quest chain needed to get the Caches which contain it, but do not open these until you are 590 expertise or above in your armor slots, as they will not be a viable drop before then.
 Augur Set if you don’t mind running some Intelligence in your build , but for most, buying or crafting this
  Angry Earth Ward gear will be the way to go.
Amulet
 Droplet is probably the easiest amulet to farm for and has a good set of perks.
 Keeper's Pendant has
  Health and
  Refreshing and an okay third perk, making it a good amulet to start with, although does require going into Mutated Dynasty Shipyard to obtain.
 Maat's Blessing is not our ideal set of perks, but is still a decent all-rounder, and can be farmed for solo unlike the other amulets.
Ring
There are no named rings that drop with ![]() Hearty and
Hearty and ![]() Sacred on them, so you will have to buy or craft yourself a ring for healing.
Sacred on them, so you will have to buy or craft yourself a ring for healing.
Earrings
There are also no named earrings that drop with ![]() Refreshing Toast and
Refreshing Toast and ![]() Healthy Toast on them, so you will have to buy/craft yourself an earring, too.
Healthy Toast on them, so you will have to buy/craft yourself an earring, too.
Heartrunes
 Brutal Heartrune of Grasping Vines is the most supportive Heartrune and the general recommendation for Healers. It provides your team with extra damage to the enemy via the rend it applies, reduces incoming damage to your tank via the weaken, and holds them in place via the root.
 Stalwart Heartrune of Stoneform is a good Heartrune to have in your bag incase your tank is struggling to hold aggro in a dungeon, as you can stick this on and avoid having your heals interrupted for the duration its active. Plus, the heals you provide are boosted if you’re standing in [ability_ability_lifestaff_scaredground].
Gems
For normal expeditions, the biggest threat you face will be taking Physical damage from enemies the tank cannot keep off you. It is advised to use a combination of ![]() Onyx,
Onyx, ![]() Diamond, and
Diamond, and ![]() Malachite gems in your armor (Diamond and Malachite offer elemental absorption, and are good to pair with Onyx, as it only offers physical absorption).
Malachite gems in your armor (Diamond and Malachite offer elemental absorption, and are good to pair with Onyx, as it only offers physical absorption).
In mutated expeditions, you will want to focus more on elemental damage absorption in your armor. Stacking ![]() Opal gems will achieve this, but it is recommended to have 2 to 3 of your Armor Sockets holding the element specific to the mutation you’re entering —
Opal gems will achieve this, but it is recommended to have 2 to 3 of your Armor Sockets holding the element specific to the mutation you’re entering — ![]() Ruby gems for fire mutations,
Ruby gems for fire mutations, ![]() Amber for nature, etc.
Amber for nature, etc.
Runeglass
An important thing to remember is that Runeglass gems should be used on your base or most used healing gear. Avoid swapping these for different weekly mutations as it will be very expensive to do so.
Using Runeglass on the ![]() Cut Pristine Diamond gear will decrease the healing slightly, but if you are going to use it, the Energizing Runeglass, such as
Cut Pristine Diamond gear will decrease the healing slightly, but if you are going to use it, the Energizing Runeglass, such as ![]() Runeglass of Energizing Amber, is the best option as it increases your stamina. This enables you to dodge more and therefore become 'invulnerable' when needed.
Runeglass of Energizing Amber, is the best option as it increases your stamina. This enables you to dodge more and therefore become 'invulnerable' when needed.
Tips for Healing
Playstyle Tips
General Tips
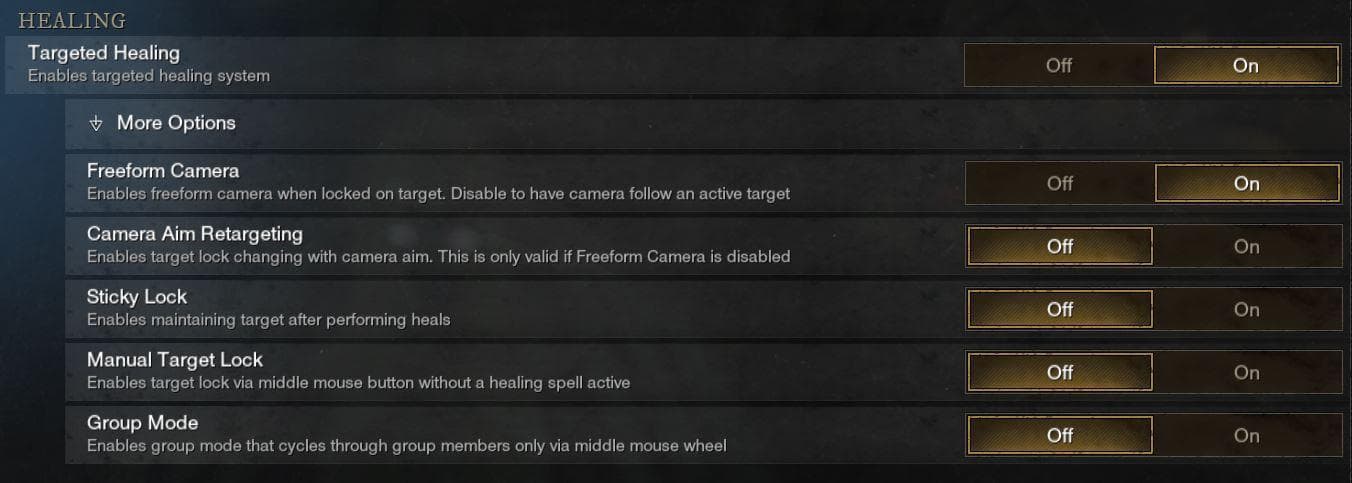
The biggest recommendation when it comes to healing in New World is to set up your Target Group Member healing keybinds. Removing the Cycle Target Up / Down keybind might be daunting, but once you’ve built the muscle-memory to select group members quickly, you will find you’re able to react to damage and heal teammates much faster.
Note: Make sure to only bind keys for members 2 to 5, and completely remove the binding for member 1. Target Group Member 1 is you, and there is already a keybind for this (default CTRL, re-bindable under Target Self) which makes it much harder to fumble and self-heal by accident.
As a follow on to rebinding your healing, a great idea (if you want to) is to invest in a new peripheral for your PC - specifically, an MMO mouse. A gaming mouse with at least 4 thumb buttons on the side of it allows you to bind your Target Group Member options to these side buttons for the quickest possible reactions.
If you need to quickly heal yourself, hold down CTRL before casting the ability, this will place the heal on yourself. This only works with the targetable abilities - ![]() Divine Embrace,
Divine Embrace, ![]() Light's Embrace, and [ability_ability_lifestaff_scaredground].
Light's Embrace, and [ability_ability_lifestaff_scaredground].
If a healing target is out of your line-of-sight but you need to heal them, you can instead start casting a heal on a party member who’s in sight, then press your keybind to select the group member who is out of sight, and the heal will end up casting on them. This is easier to do with ![]() Divine Embrace /
Divine Embrace / ![]() Light's Embrace due to their cast time, but can be done with [ability_ability_lifestaff_scaredground] if you’re very quick.
Light's Embrace due to their cast time, but can be done with [ability_ability_lifestaff_scaredground] if you’re very quick.
Pve Tips
Healing generates a lot of threat, so you may find your tank occasionally loses aggro on a few enemies and they come for you - do not panic, but instead dodge through their attacks and head towards your tank. This will pull the wayward enemies back towards your team so your tank can easily attack them and get their attention again without breaking taunt on their current mobs.
Don't try to withstand ranged damage or waste heals on yourself needlessly. If a ranged enemy is attacking you in a dungeon, try to look for a wall or something to break the enemy's line-of-sight. This will cause the enemy to run closer to you in order to attack, giving your tank or melee teammates more opportunity to deal with it.
Ability Rotation
Before using any heal, try to always dodge to activate ![]() Bend Light and, if possible, land a Heavy Attack to activate Intensify. This will increase your healing by up to 50% (based on your number of stacks of Intensify) which can make a huge difference.
Bend Light and, if possible, land a Heavy Attack to activate Intensify. This will increase your healing by up to 50% (based on your number of stacks of Intensify) which can make a huge difference.
For those of you running standard healing builds with Void Gauntlet, do not spend time attacking with the Void Gauntlet. Unless you’re trying to push extra damage (such as when an expedition boss or the Outpost Rush Baroness is near to death), Void Gauntlet should only be swapped to in order to use one of its abilities, after which you should swap back to Life Staff ASAP.
Don't rely purely on Life Staff abilities. By using the Life Staff's Light and Heavy attacks on both enemies and teammates, you can reduce your cooldowns via ![]() Refreshing Move and
Refreshing Move and ![]() Revitalize, as well as provide a pretty substantial amount of healing with
Revitalize, as well as provide a pretty substantial amount of healing with ![]() Blissful Touch, so the more time you spend with the Life Staff in hand, the more effective a healer you are.
Blissful Touch, so the more time you spend with the Life Staff in hand, the more effective a healer you are.
In-Game Settings
A good thing to remember is that if you are using [ability_ability_lifestaff_scaredground], ![]() Orb of Protection and
Orb of Protection and ![]() Beacon, you should turn targeted healing off.
Beacon, you should turn targeted healing off.
About the author
BagginsTV A partnered Twitch streamer and fulltime YouTuber, Baggins is a New World guru and healer main creating in-depth guides and tips, tricks and tactics content to help players improve and excel in-game. 

This Guide is outdated.