How to Get More Void Ore – The Truth behind Yield Boost and Double Proc
Lets take a closer look at how Gathering Yield works and the Yield boost that the game doesn't tell you about.
After some additional testing, it seems that we can't reliably reproduce the double proc in some cases. The information regarding some values and stacking for some of the buffs mentioned in this article might not be 100% accurate.
Note: After the 16th December patch, Territory Standing Gather card will no longer provide yield. It will instead provide gather speed. This means that you can no longer achieve a 100% yield boost value, meaning you can no longer proc double drops. This means that everything in this article is not gonna help you so, unless you're curious about the details, you can probably stop here.
Gathering ![]() Void Ore from mining is a lengthy process, as some of you may already know. While I won't go into much details about the drop rates for it - as that requires an article on its own - I'm gonna tell you one thing: get more luck! A lot more. Ignoring the numbers shown on luck descriptions, the reality is that, as your luck goes up, your drop chance at the rare stuff increases exponentially. Now, lets get back to Yield and how to get double proc.
Void Ore from mining is a lengthy process, as some of you may already know. While I won't go into much details about the drop rates for it - as that requires an article on its own - I'm gonna tell you one thing: get more luck! A lot more. Ignoring the numbers shown on luck descriptions, the reality is that, as your luck goes up, your drop chance at the rare stuff increases exponentially. Now, lets get back to Yield and how to get double proc.
Yield Mechanic
Yield is a simple number that multiplies the amount of items you get, simple enough. For example, if you drop 8x ![]() Ragehide, a 20% Yield Boost would make that become 9.6x which gets rounded down to 9x.
Ragehide, a 20% Yield Boost would make that become 9.6x which gets rounded down to 9x.
This is very important when it comes to resources that always drop in a 1x quantity, such as ![]() Void Ore,
Void Ore, ![]() Quillbark,
Quillbark, ![]() Chunk of Crystal and many others (you can see the quantity they drop in and the minimum luck you need, if any, by searching the item on our database and checking the loot tables). From a technical point of view, if you have at least 100% Yield Boost, any drop quantity of 1x will become 2x.
Chunk of Crystal and many others (you can see the quantity they drop in and the minimum luck you need, if any, by searching the item on our database and checking the loot tables). From a technical point of view, if you have at least 100% Yield Boost, any drop quantity of 1x will become 2x.
Yield Sources
Lets dig into how exactly you reach 100% Yield Boost now. The following list will contain all the possible sources for this:
-
10% Yield Boost from having 250 Strength.
-
15% Yield Boost from the
 Powerful Proficiency Boost - this is the highest tier booster available.
 -
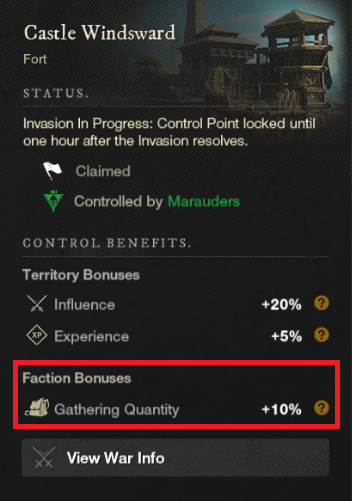
10% Yield Boost if your faction owns the Castle Windsward fort. This buff applies in all territories.
- Up to 65% Yield Boost for putting 140 points into the Gathering Speed card for territory standing. Apparently the card doesn't only boost the Gather Speed, but also the Gathering Yield. This requires Standing Level 300 so, it's not a realistic value. A more realistic value would be 35% Yield Boost for 20 points in the Gathering Speed card, which requires you to pick it every time it shows until Standing Level 42. A full table of pick options can be seen in our Territory Standing Table.
- The bonus for the first pick is 5%.
- Each new pick will be 13.5% lower value than the previous one.
- The absolute minimum value it can go down to is 0.25%.
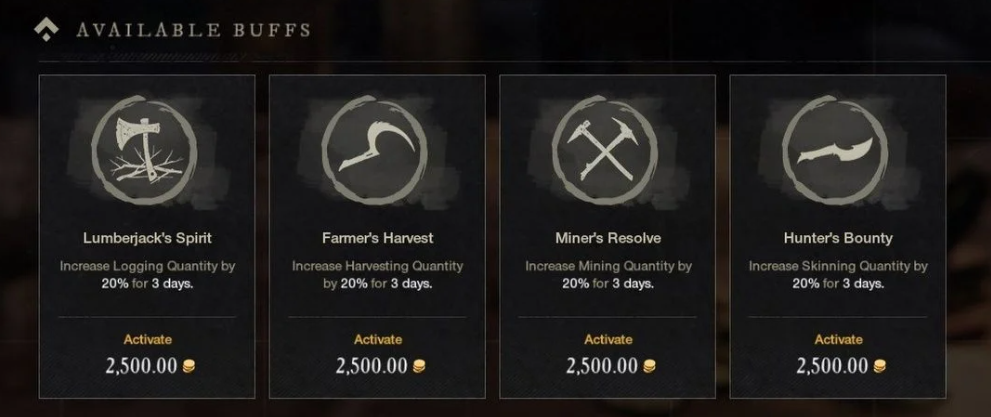
- 20% Yield Boost (per buff) from the Lifestyle Buff (Miner's Resolve, Hunter's Bounty, Farmer's Harvest or Lumberjack's Spirit).
- These buffs also offer a hidden 500 luck boost, which would be equal to something like
 Reinforced Mining Luck.
 - You must own a house in that Town in order to receive bonuses from Lifestyle Buffs and the house tax must be paid.
- Owning multiple houses in the same Settlement won't multiply your buff.
- The buff seems to be global and you can stack it from multiple territories. For example, having two Miner's Resolve buffs active wil give you a 40% Yield Boost.
- These buffs also offer a hidden 500 luck boost, which would be equal to something like
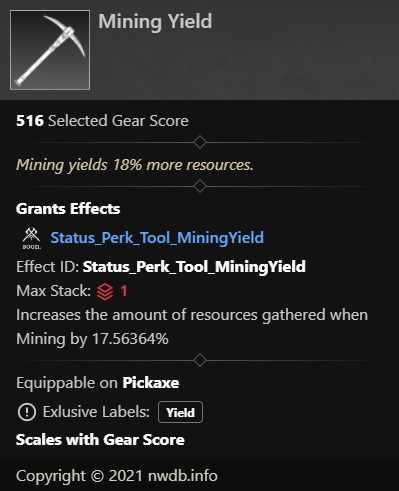
- 19% Yield Boost from the Pick Axe perk (at 600 Gear Score)
 Mining Yield. Note: just because the game says x%, it doesn't mean it's exactly that, since the game UI rounds the perk values shown. The database will usually show you raw values, so you can do your math accurately.
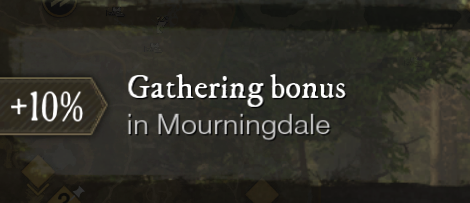
- 10% Yield Boost from the faction control buff. According to the wording in game "+10% Gathering bonus in Mourningdale", this buff should only apply in the territory it comes from.
- This boost is multiplicative. For example, if you have a 50% yield boost (150% total yield) without this buff, it will become
150% * 110% = 165%
- This boost is multiplicative. For example, if you have a 50% yield boost (150% total yield) without this buff, it will become
Hopefully this will make your ![]() Voidbent Ingot journey easier, given the extremely low chances for
Voidbent Ingot journey easier, given the extremely low chances for ![]() Void Ore to drop. I will probably follow up with an article that dives into the luck side of things, with some proper drop chance numbers.
Void Ore to drop. I will probably follow up with an article that dives into the luck side of things, with some proper drop chance numbers.
Stay safe in Aeternum!
Edit 1 - November 4, 2021: The information in this article has been updated after some findings by user SkyLineOW, published in this post on Reddit.
About the author

I finally hit double mining procs for the first time. My set up is:
19% pickaxe (GS 600), 15% proficiency booster, 27% territory bonus, 10% STR bonus, 10% faction control bonus, and 20% miner's resolve
for a total of 101%. My faction does not control Fort Windsward. Note: Miners resolve, like all trade skill town projects, does NOT stack. I tested miners resolve having 3 x 20% buffs at the same time, but my yield was the same as one 20% buff. I have seen weird theories about who needs to control the town and which territory you need to be in, but I have gotten the 20% globally no matter who controls the territory my house is in.
Conclusion: I think the only edit the above article needs is that the max from miner's resolve is 20% (not 60%). However, I am unsure about the effects of Fort Windsward as I have not tested those.